Recently, I’ve been picking up more and more video work. As a team of one, shaving every second off the process I can is paramount to meeting deadlines. That said, no one wants to view an ugly, confusing video. I’ve found the easiest way to make your message clear to the most people, watching in the all sorts of different circumstances is to add graphics to reinforce your point. These graphics can seem daunting to make, but with a little scripting magic you can make them totally automatic. An ideal template should be able to handle whatever is thrown at it, long segments of text, different lengths on the timeline, and even different layouts.
Basic Callout
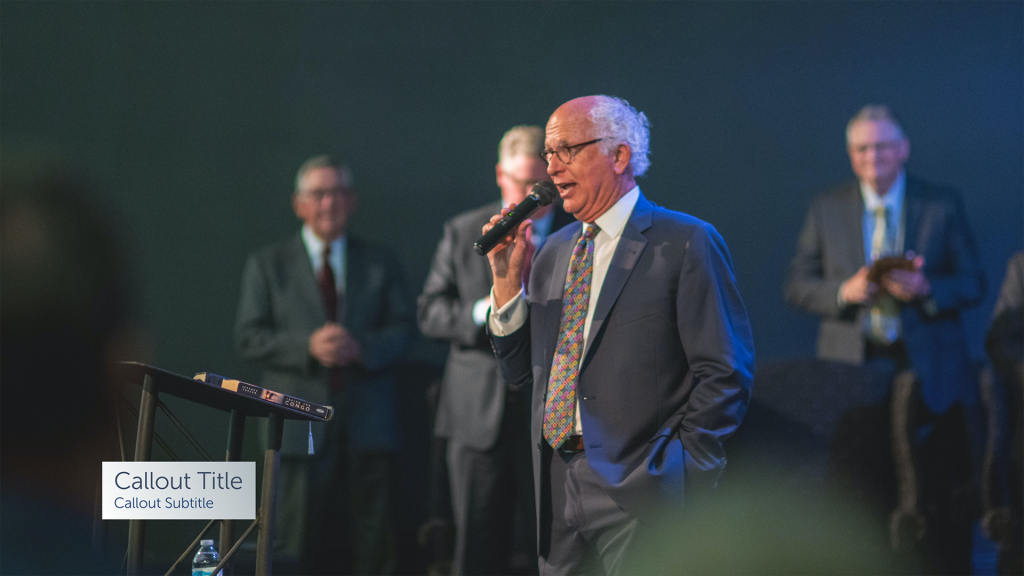
Let’s start with the simplest form of template, here’s an example of what the final product looks like:
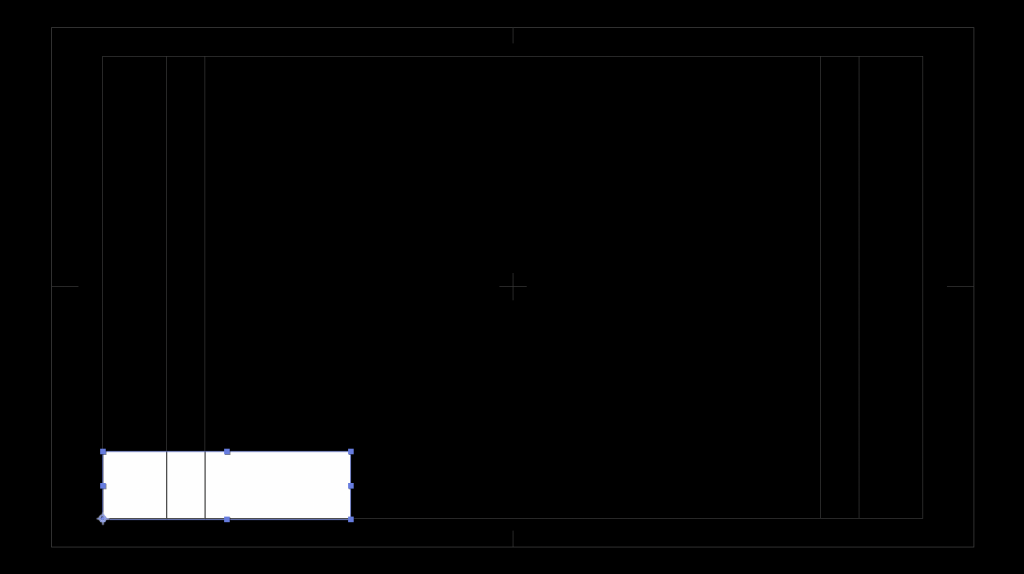
To lay down a framework for this graphic, we have to start building with this responsiveness in mind. First we can add a box for the background. We need to think about how our template is going to work before we begin putting objects on the timeline. The end result should be a template with two input fields that can contain any text. In this case, we should also include a nice animation to motivate the element on and off screen. Those two attributes give us 2 degrees of freedom we need to properly control the box. In this case, I used a shape layer with a box. This gives me a width parameter in pixels, which we can use to expand the box with the length of the text. It also gives us a scale property that we can use for the entrance and exit animation.
Now that we have a game plan, lets jump into the timeline.
The Background
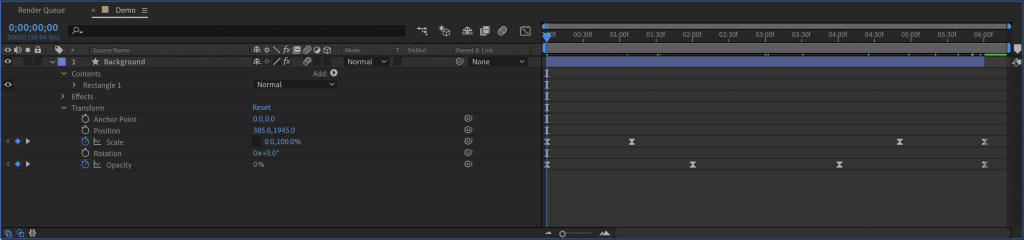
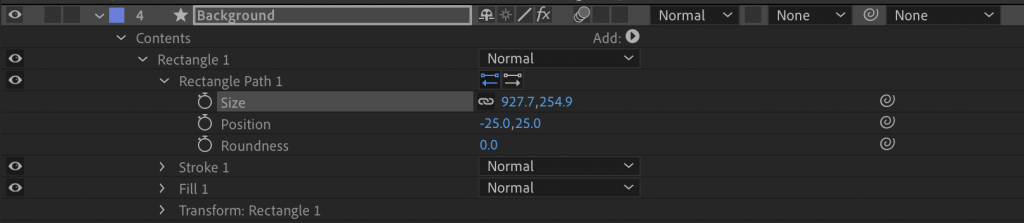
Notice the position of the anchor point, it is in the bottom left corner of the shape. This means that when we scale it, it will expand from that point. Unlinking the scale axis, we can animate the X scale to make the callout pop out. I’ve also added keyframes for opacity here to make the entrance less jarring.
I would also highly recommend jumping into the graph editor for those keyframes, and add some curves! I like to approach my entrances by starting out fast, and slowly coming to a stop. I’ve done this with the opacity parameter as well.

Now that we’ve gotten some basic animation out of the way, let’s spice up this shape. In this example, I’ve added a simple gradient ramp to the box. Feel free to experiment with different animation styles, movements, and colors.

Global Controller
Next step, let’s start thinking about how we are going to control this template. If you do not already have it open, enable the Essential Graphics panel from the Window menu.
Coincidentally, there is a lot of cool stuff in After Effects. After this article, you should check the windows panel for tools you haven’t used before. I was not even aware the essential graphics panel linked between After Effects and Premiere Pro until seeing it in this menu.

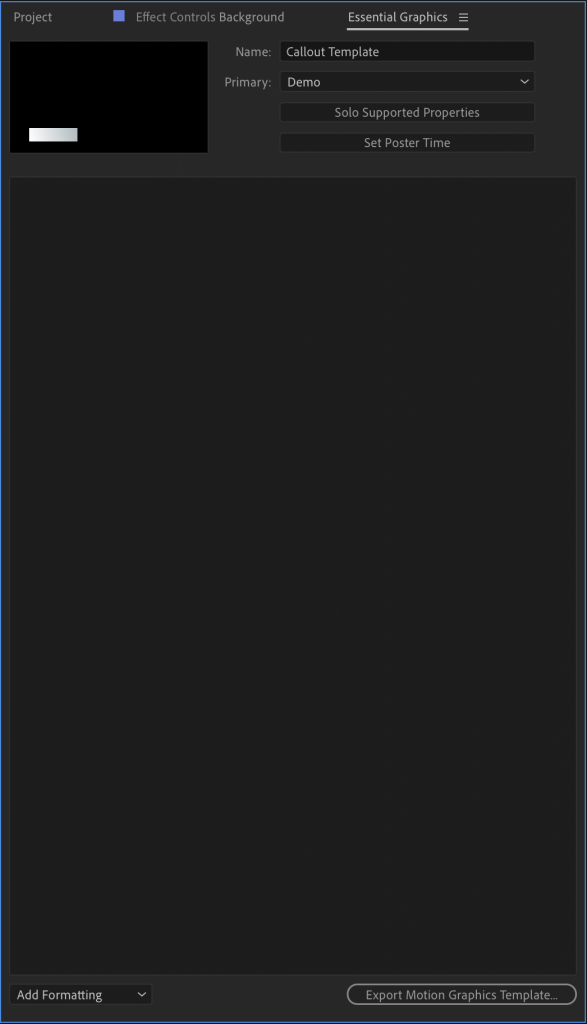
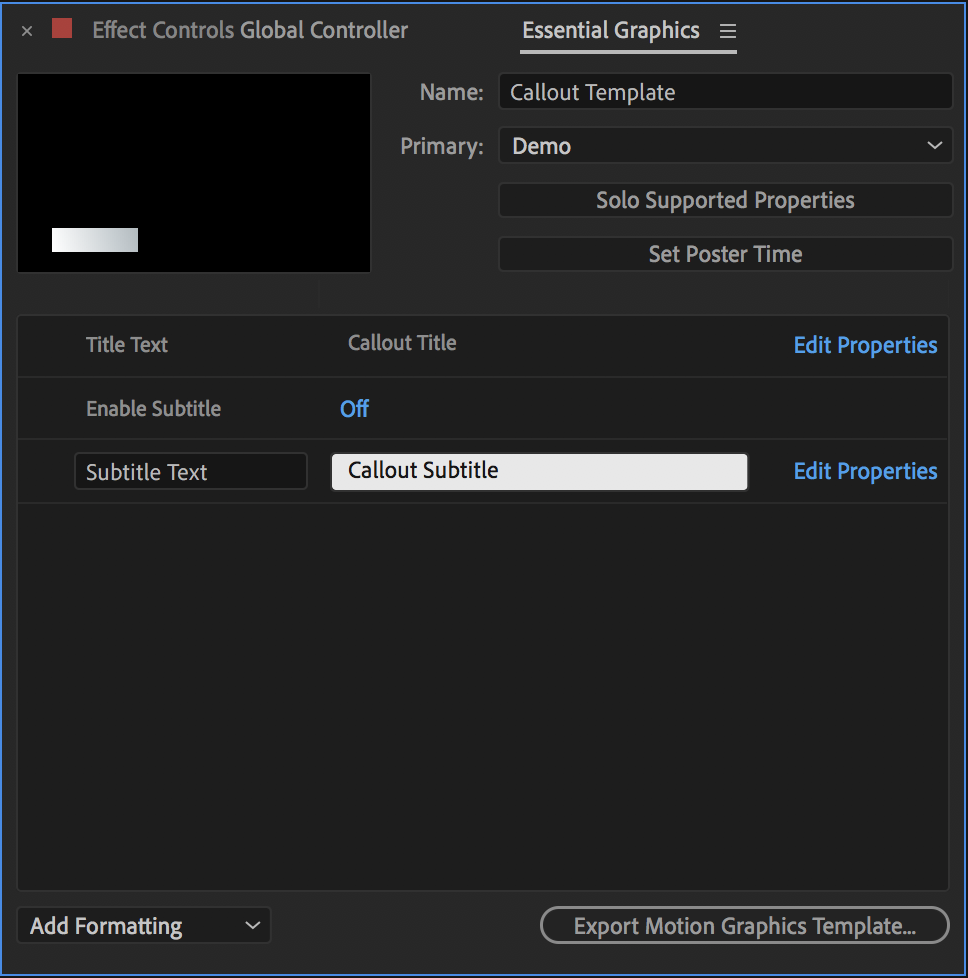
This is the essential graphics panel, you can think of it as the “other side” of the template. When you drag your template into a Premiere Pro timeline, the properties you dictate here will be the only fields that can be changed from the Premiere Pro essential graphics panel. Do not drag every property you have, use these fields sparingly. Your After Effects composition should be doing the heavy lifting after all!
- The Name parameter, somewhat obviously, sets the name for the template. This is what shows up in Premiere’s Essential Graphics panel
- The Primary parameter specifies the root composition that the template will be linked to. Make sure you have the correct composition selected!
- The Set Poster Time button allows you to pick a frame from your template to display inside Premiere’s Essential Graphics Panel
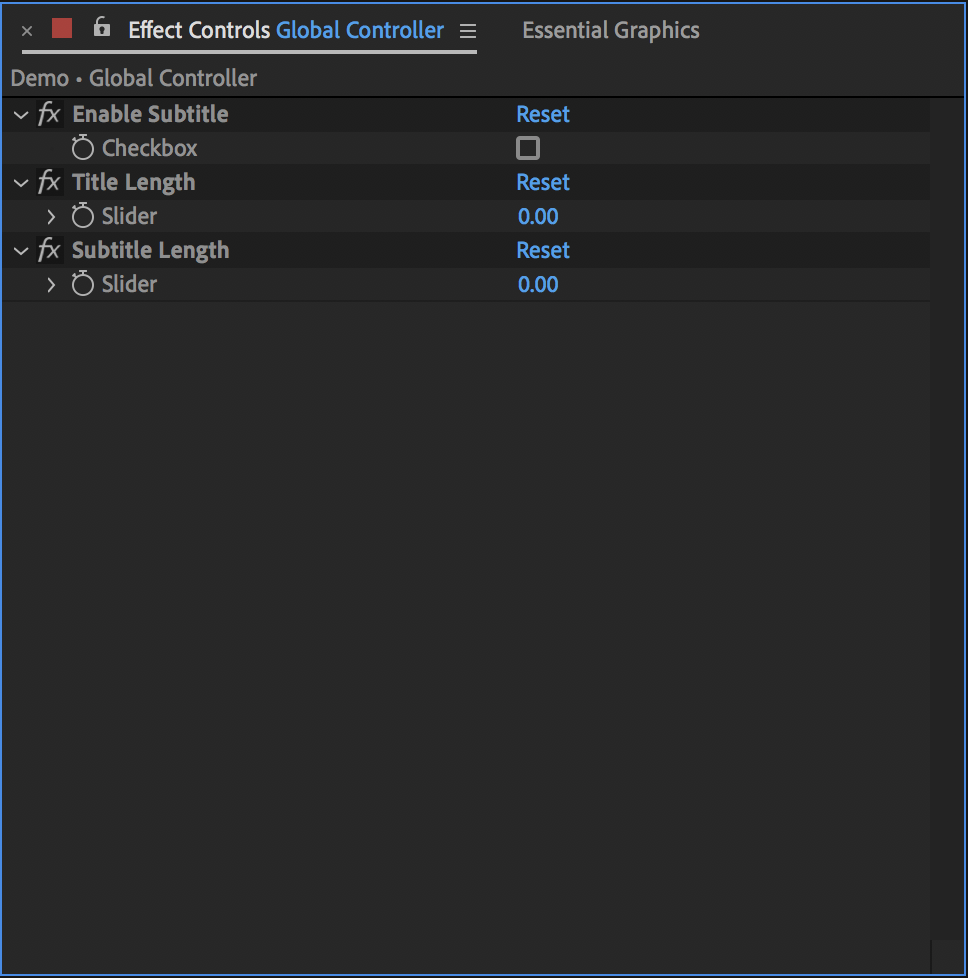
Our global controller will be a dummy null object that contains all the extra options we want to use to control the composition. Some parameters like text are easy, just drag the parameter into the Essential Graphics file and get going, but some attributes like enabling and disabling lines of text, adjusting numbers on screen, etc, are done best with expression controls. Some compositions will have many scripted controls, but for this one in particular, we’ll just need one Checkbox Control effect, to control the visibility of the subtitle. For the purposes of this example though, let’s add 2 more sliders. We won’t expose these to the user- Using scripts, we will set these equal to the length of each line of text. This will help us later with calculating the width of the box. Go ahead and add the source text parameters from the two text areas as well, you can do this by dragging the matching line from the timeline into the Essential Graphics Panel. This is what the Global Controller Null, and Essential Graphics Panel should look like at this stage:
Finding the Size of the Text
Ok, time for the fun part! Let’s start adding some scripts to make things happen on their own. Remember those slide controls we just added? Let’s start with those. We need to measure the width of both the title, and the subtitle text box. Start a new expression by Alt+Clicking on the keyframe stopwatch in the expanded timeline view.
Now we need to enter in the expression to get the title length. You can use the pick-whip tool (as shown below) to autocomplete the code to get to the object, then you need only add the end of the command to specify you are looking for the length of that object.
When you are finished with the expression, it should look like this:
thisComp.layer("Title").sourceRectAtTime().widthAdditionally, the value should have changed on it’s own, this should now be the width of that text in pixels. Go ahead and do this for the other slider, and subtitle. Expressions in After effects work by using whatever value is “returned” from the expression as the value for the component/effect. In this case, we are simply stating a value, so it is implied that we are returning it to After Effects.
Background Width
Now that we have both of those values, we can script the background to widen and shorten to the perfect length to match the text. Create a new expression in the size parameter of the shape for the background.
In this case, the value we are modifying is an array, in that case, we also need to return an array. For now, lets just decide return a hardcoded value for the height. As for the width, we should set that based on the longer of the two values. After all, if the subtitle is longer than the title, we wouldn’t want to make the box too small. We can do this with a simple if statement:
if(thisComp.layer("Global Controller").effect("Title Length")("Slider") > thisComp.layer("Global Controller").effect("Subtitle Length")("Slider")){
     //Option A
}else{
     //Option B
}
All this statement is saying is, if the title is longer than the subtitle, run the code in option a, otherwise, run option b. Now that we’ve setup the two cases, we can size the box. Since we want some space on either side of the text, we should also add a fixed value that will represent the “extra” box on either edge. Let’s say we want 50 pixels on either side, or 100 pixels total for both sides. This should be the script we end up with:
if(thisComp.layer("Global Controller").effect("Title Length")("Slider") > thisComp.layer("Global Controller").effect("Subtitle Length")("Slider")){

     [thisComp.layer("Global Controller").effect("Title Length")("Slider")+100,255]

}else{

     [thisComp.layer("Global Controller").effect("Subtitle Length")("Slider")+100,255]

}
Remember, in this case, we are hardcoding a value for height. At this point, our box should start resizing on it’s own!
Background Height
Now for the height. First things first, let’s make an expression for the opacity of the subtitle. Given the only way to change the height is by removing or adding a subtitle, we need to have a way to do that! We could use another if statement here (if you wanted to get really fancy, you could use an if statement to either return 0, or the opacity of another null object, allowing you to animate the object as well as toggling it, but this is a simple example) there is a trick to do it in one line. A “Checkbox Control” returns a 1 if it is checked, and a 0 if it is not. Given that opacity is only 0-100, you can just pick-whip the property, and multiply by 100.
The trick works, but oh no! Now the title is off center! We can fix this with a new expression to move it when the subtitle is disabled. For this, we can use the anchor point. Create a new expression that moves the title down to where the subtitle used to be when the checkbox is checked:
if(thisComp.layer("Global Controller").effect("Enable Subtitle")("Checkbox") == 1){
     [0,0]
 }else{
     [0,-90]
 }
We can now add the last expression to the background, all we need to do is modify the code we used to adjust the width of the box. Using a nested if statement, we can change the height to be lower if the subtitle is disabled.
if(thisComp.layer("Global Controller").effect("Title Length")("Slider") > thisComp.layer("Global Controller").effect("Subtitle Length")("Slider")){
     if(thisComp.layer("Global Controller").effect("Enable Subtitle")("Checkbox")== 1){
         [thisComp.layer("Global Controller").effect("Title Length")("Slider")+100,255]
     }else{
         [thisComp.layer("Global Controller").effect("Title Length")("Slider")+100,150]
     }
 }else{
     if(thisComp.layer("Global Controller").effect("Enable Subtitle")("Checkbox")== 1){
         [thisComp.layer("Global Controller").effect("Subtitle Length")("Slider")+100,255]
     }else{
         [thisComp.layer("Global Controller").effect("Subtitle Length")("Slider")+100,150]
     }
 }
(If you are having trouble reading this code, you may want to try on a larger screen to prevent wrapping) There we have it! An auto sizing text box. To animate, simple create null objects for each element to animate, and then pick-whip their values into your scripts. That way you can “choose” to animate, or leave alone depending on which options are selected. At this point you can click “Export Motion Graphics Template…” in the Essential Graphics panel, and this template, with all it’s options, will appear in the same panel within Premiere Pro.
Have fun with making templates, and experimenting with what is possible. You can take this system very far, and if you are an individual whom does a large volume of editing work, it is most definitely worth the effort.
Happy Hacking!

Pup Atlas, Chief Good Boy