Over the weekend I’ve been doing a whole lot of work on our video system restructuring. Move matrix A over to this rack, switcher here, patch these two components together, configure A to talk to B, you get the picture (If I configured it right at least). It made me realize just how much configuration can be done on your average system, you can make your system work much better for a particular show with a few simple tweaks in a web interface somewhere. On the other end of the spectrum, you can create a lot of problems for the less skilled user if something is misconfigured. Something simple like a projector being on the wrong input can cause a very unhappy A/V tech to make an unplanned visit to the venue before a show. The moral of the story is this, the configuration is important, and sometimes to fit the show, it just needs to change. But the end-user shouldn’t have to have full knowledge of the system to do something simple like playing a DVD on the big screen. This got me thinking, is there a simple way to have a “Master Configuration”? One that can be loaded instantly, with one press of a button, and take no more expertise than hitting play? Could there be a system where 1 expert on the system can make a show file, that has everything in it, configuration, and content? So that all an operator needs to do is press Go, and it’ll work?
So the task had been set, find a way to automate anything and everything on the network, and create a process that allows new gear to be incorporated without much fuss. To make this easier, we’ll break it up into easy to follow steps. For this article, I’ll be using the most recent integration I’ve done, the Gefen Ultra HD 600 MHz 4×4 Matrix. But this same process should work on any piece of gear you can hit over the network.
How does the web interface do it?
I want to configure my gear to certain settings for certain shows right? So how would I approach that problem with no automation? Generally, I’d hop into the settings, find its IP, and find the web interface. Most of the gear I’m coming across now has an ethernet jack on the back for integration with all sorts of things, Crestron, proprietary apps, web interfaces, etc. Below is my example gear, which I’ll use to demonstrate the process.
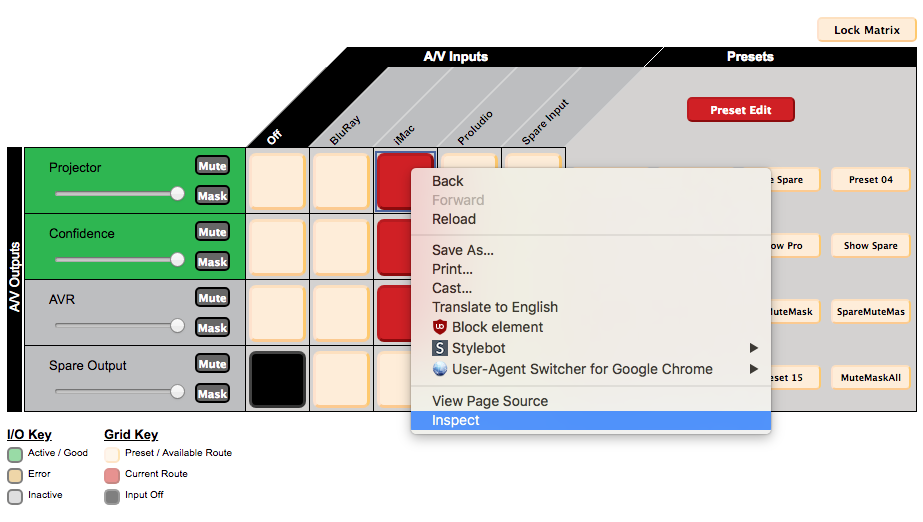
Once I’m at the web interface for whatever piece of gear I’m using, all the settings populate, and are adjustable. It’s important to note what data actually exchanges here, so we know what’s possible in QLab later. In the case of the Gefen Matrix, the browser can see the current state of the matrix, all the input, and output names, the preset names, and which paths are good, erroneous, of have sync issues. The data our browser can send is individual matrix adjustments, mask/mute functionality, and setting presets. Since we know that the browser is capable of this RX/TX, we know that that functionality is exposed over the network, and in the form of an HTTP API of some sort (usually this means rEST, but not always, some equipment even uses straight udp packets in lieu of HTTP). Now, lets see what is actually happening when we press some buttons. (Assuming you’re using chrome) Right click anywhere on the page, and select “Inspect.”
This will open up your developer console. This console is very valuable for many automation tasks, and can even sometimes expose more functionality than the interface will let you adjust. For now, let’s head over to the network tab. This will let us see the requests the browser is making to our gear.
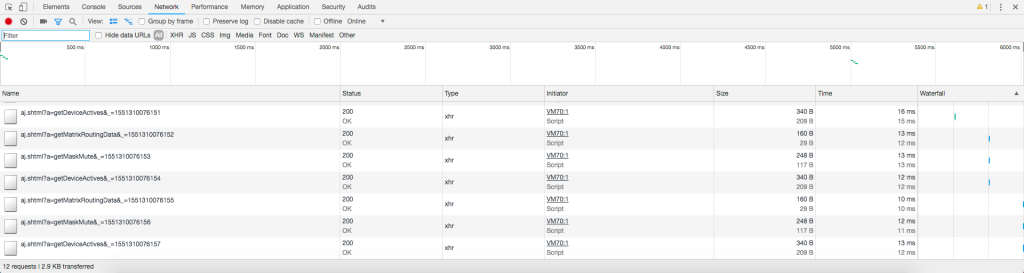
The red button in the top left corner is our record button, when it’s illuminated, the requests our browser is making to our gear is being recorded and displayed below. The button to the right of it is our clear button, which will clear our log of requests. Once you load the page you are trying to automate, go ahead and stop recording, and clear your log. For our example, we’re going to try automating setting a preset on our video matrix. We’ll hit record, then quickly go press the button, and stop recording. In that time the log should populate with requests your browser sent to execute that action, lets look at them in further detail. Click to select a specific request in detail view.
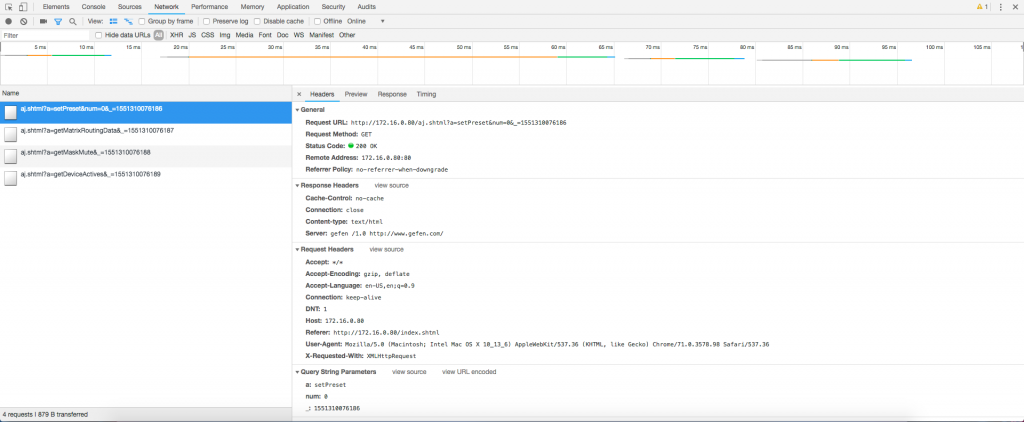
Looking at the name of the request, we can make some assumptions about the gear we’re working with. All requests start with the same text “aj.shtml”. In API speak, this is called an “endpoint”, and it’s the point where all your interaction with said API takes place. following that we see ?a=setPreset&num=0&_=… this is called a GET request, we are sending a number of variables along with a request to perform a certain action. The ? denotes the beginning of the variable array, and the end of the endpoint, a variable name is specified, along with an = and that variables corresponding value, an & starts the next “Key Value Pair” (the official name for a variable name, and it’s associated value.) The data is formatted this way for easy insertion into a URL, but it can be arranged in a more human readable way, luckily for us, Chrome’s developer tools does this for us, at the bottom of the detail view for a request.

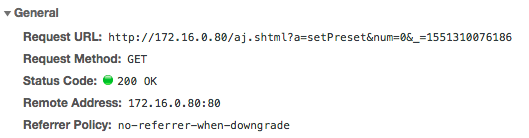
Now that we have the actual information being transmitted, we can begin to reverse engineer what it means. A is equal to “setPreset”, pressing other buttons, we can see that a is always present in a request, but has different values depending on the type of button, from this information, we can ascertain that a really means “What action are you trying to perform.” This is something that we’ll want to make note of, and use later. The next variable is num. From pressing other buttons, we can see that it’s only present with preset buttons, and corresponds with the number of the preset we are setting. This is another useful parameter we’ll wanna use later. The last one is a bit trickier. Underscore doesn’t have an immediate meaning that jumps out at us, the value is long and doesn’t make much sense, and it changes every time we press the button. In reality, this is a completely random number inserted into the URL to prevent caching, this isn’t very useful to us, so we can just ignore it, and move on without it. Looking up in the inspector, we can see some more general information about the request that we can use to reconstruct it later, including the full request URL, and the method of transmission (in this case, GET.)
That’s it, we now have everything we need to send our own requests to the gear without needing to use the web interface. Now it’s time for….
Using the API on our own.
Now that we have our endpoint, in my case:
http://172.16.0.80/aj.shtml
and our parameters
a: setPreset
num: (preset number)
we can begin to construct a custom request. Note: be careful here, in the web interface, you’re restricted from requesting things that don’t exist, like preset -1, or 9999, but that’s not so when accessing directly. Most gear should handle bad data fine, but some might not. Here’s my completed test URL:
http://172.16.0.80/aj.shtml?a=setPreset&num=0&_=1551310077954
In theory, I should be able to paste this into chrome, hit enter, and watch the matrix reset to preset 0. Trying it out, it works as expected, the page this returns is blank, but that’s to be expected, and common for API’s, because we’re not asking for any data, just that an action be done. If your gear does not respond to this, you could be experiencing an authentication issue (did you have to log in to see the web interface? Interestingly enough, many web interfaces will be password protected, while their API requires no login at all), or perhaps a formatting issue. Consult your network panel in the inspector to see what HTTP code your gear responded with, for information on what these codes mean, check the Wikipedia reference.
Assuming all worked well, then you are ready to move on to step 3:
Can we do it from outside chrome?
Controlling gear by URL is all fine and good, but it is decidedly not show control. For that, we’ll need more lightweight and integrated communication. It’s time to see our old friend, the terminal. I realize that many of you reading this might not have given the terminal a second glance in your OSX activities, but it’s one of the most powerful features in any integrator’s tool bag. The particular command that we’ll be using today is cURL. I’ll let the experts that edit Wikipedia explain:
cURL is a command-line tool for getting or sending data including files using URL syntax.
https://en.wikipedia.org/w/index.php?title=CURL&oldid=884068968
Now that we know what it does, we can start to build our command to replicate that chrome tab. Lets deconstruct the finished command that I used on this project:
curl 172.16.0.80/aj.shtml -d "a=setPreset&num=0"- The first word is pretty easy, curl, the name of the command we’re running.
- After that we have our endpoint that we found earlier, still simple.
- The next bit might be new to some of you, a dash with a letter after. This is called a command flag and is used to denote certain settings for commands. In this case, the d flag for curl means data, and following that flag, we have the data we want to send to that endpoint surrounded by double-quotes. (notice we’re missing the ? here, since curl knows that this is GET data we’re sending, we don’t need to tell it again that we’re starting this data)
That’s it! Hit enter, and I see my settings update live in the web interface, and now that it’s in terminal form, it can reside in a bash script that runs in the background, automated through almost any tool, and in our case, controlled from QLab.
Why didn’t you use the built in QLab network cue to send messages?
QLabian Citizen
Using terminal commands is infinitely more configurable, and the IP moves with the cue, instead of being set in the show file. We also used only stock OSX commands. In practice, this means that you can copy-paste the cue we’re about to make into any show file, on any machine, and it will work, with zero configuration. Great for making show files on the fly, or years down the road when you have no idea what the IP for your gear is.
QLab time.
Now that we have our terminal commands, we’re ready to jump into QLab, make a new blank show file, and drag in a scripting cue. In QLab, scripting cues run a language called AppleScript. The more observant among you will notice that AppleScript, and Bash (terminal) are not the same language, and you’d be right. But you can actually run terminal commands from AppleScript with the “do shell script” syntax, then you just put your command after enclosed in double-quotes, you must escape the double quotes in your terminal command with a backslash before, to tell AppleScript to ignore them. The final script cue (in my case) ended up looking like this:
tell application id "com.figure53.QLab.4" to tell front workspace
     do shell script "curl 172.16.0.80/aj.shtml -d \"a=setPreset&num=0\""
end tell
All you need do now is press go, and there you have it, your gear, controlled through QLab. Another added benefit is that this is all within the scope of AppleScript, which means you can integrate further with QLab, you can pop up dialogs, ask questions, fill in bits of your command with variables from QLab like cue names. The sky is the limit. For some added inspiration, I’ve adapted this technique for our movie show control files. All the operator needs to do at the top of the week is open the base show file, and immediately, a dialog pops up with questions about the movie. When the wizard is done, all you need do is Save As… The wizard takes care of arranging, enabling/disabling, and configuring so that on the day, the operator only needs to open the file, and press one button to set up the show, the projector will automatically turn on, switch to the right input, the matrix will preconfigure itself, and move during the show, the lighting will follow according to questions asked by the wizard, and running the show requires 0 expertise with our system. Just open the file, and go.
I hope you enjoyed this guide, if you liked this content and would like to see more, consider donating!

Pup Atlas, Chief Good Boy